KryptoCamp 教練 Harry Chen 撰寫發表,為 2023 ITHOME 鐵人賽 Web3 組冠軍作品
Day 9 - Web3 與後端:實作錢包登入 Part 2
今天我們正式進入 Web3 與後端的開發,在 Day 7 的前端程式已經準備好了簽名的訊息及簽章結果,因此後端需要提供一個 API 來驗證這個簽名,若驗證通過就可以任意選擇一種 Session 的實作方式來讓前端維持這個登入狀態。今天會示範用 golang 實作 Personal Message 以及 SIWE Message 的簽名驗證功能。
準備資料
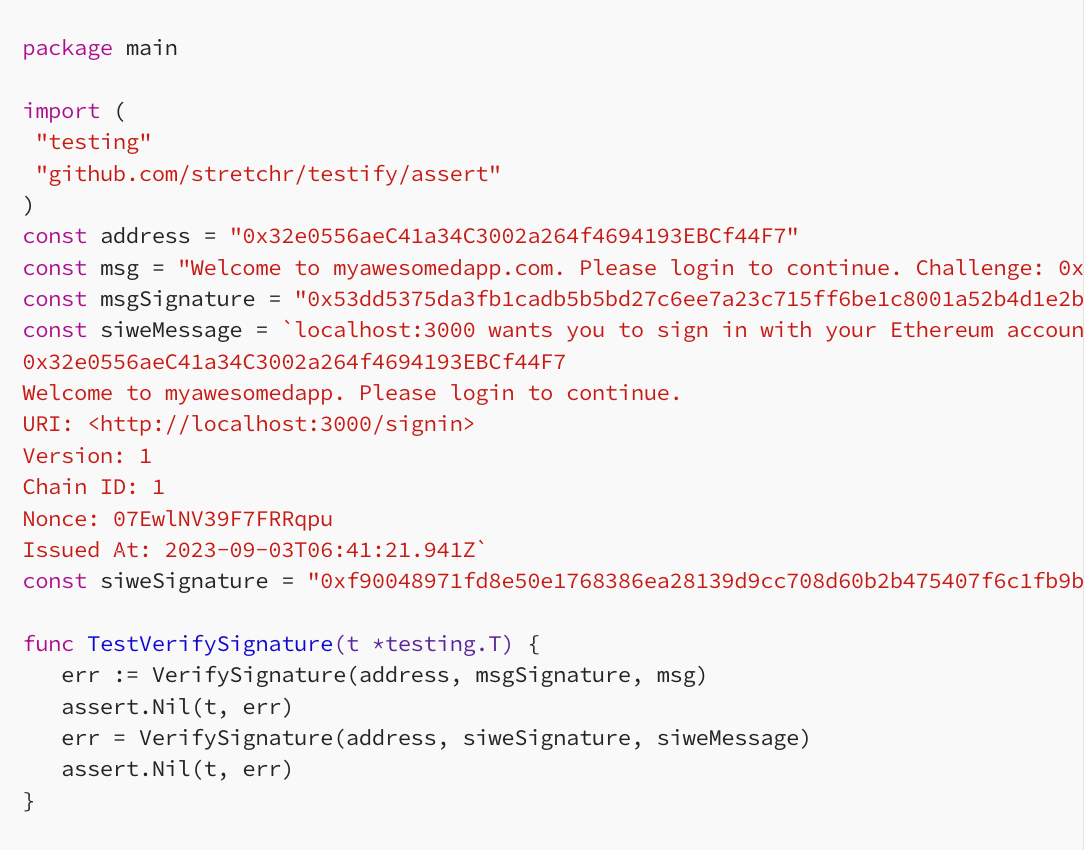
在 Day 7 我的地址(0x32e0556aeC41a34C3002a264f4694193EBCf44F7)使用 Sign Personal Message 簽名的第一個訊息為

Welcome to myawesomedapp.com. Please login to continue. Challenge: 0x32e0556aec41a34c3002a264f4694193ebcf44f7:1693724609簽章結果為

0x53dd5375da3fb1cadb5b5bd27c6ee7a23c715ff6be1c8001a52b4d1e2bb206e078f337645e223899b38a908a68d19c71850e4a48dc8753de1c3c8cd401c72bbf1b還有簽名 SIWE 的訊息內容為
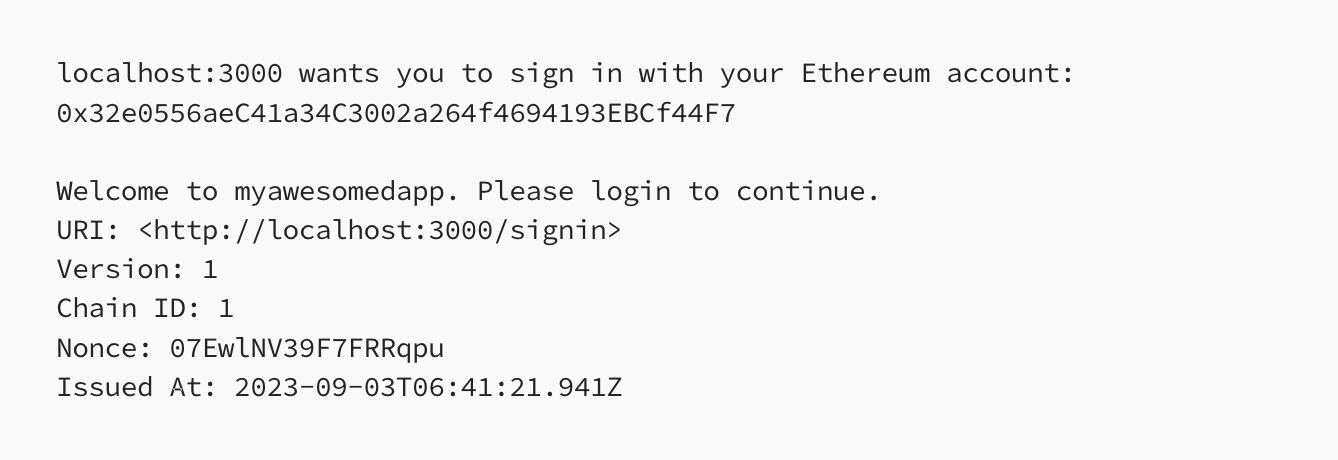
localhost:3000 wants you to sign in with your Ethereum account:0x32e0556aeC41a34C3002a264f4694193EBCf44F7
Welcome to myawesomedapp. Please login to continue.
URI: <http://localhost:3000/signin>
Version: 1
Chain ID: 1
Nonce: 07EwlNV39F7FRRqpu
Issued At: 2023-09-03T06:41:21.941Z
對應的簽章結果為

0xf90048971fd8e50e1768386ea28139d9cc708d60b2b475407f6c1fb9bcad34df48f0d310d5eaf7a99b30f518ade8d712637f73681a372b461519c38ef3ab9f8e1b這些資料就可以作為後續核心驗證邏輯的測試資料,來確保實作的 function 正確。
驗證 Personal Message Signature
go-ethereum 是以太坊官方使用 golang 來實作整個以太坊協議的 repo,它提供了讓每個人都能把以太坊節點跑起來的功能,因此這個 golang package 裡也有非常完整的以太坊相關 utils function 可以用,包含今天需要的驗證簽章的 function。因此我們在初始化 golang project 時先安裝好 go-ethereum

go mod init github.com/a00012025/ironman-2023-web3-fullstack/backend/day9go get github.com/ethereum/go-ethereum接下來最核心要實作的驗證邏輯是:當拿到錢包地址、簽名訊息以及 signature 時,要能判斷這個簽章是否真的是這個錢包地址簽名出來的。而因為簽名 Personal Message 背後的機制是他也會先基於這個訊息去算出一個 hash,再用私鑰簽名這個 hash,因此這裡也需要先算出對應的 hash 再做還原。function 定義及步驟大致長這樣:
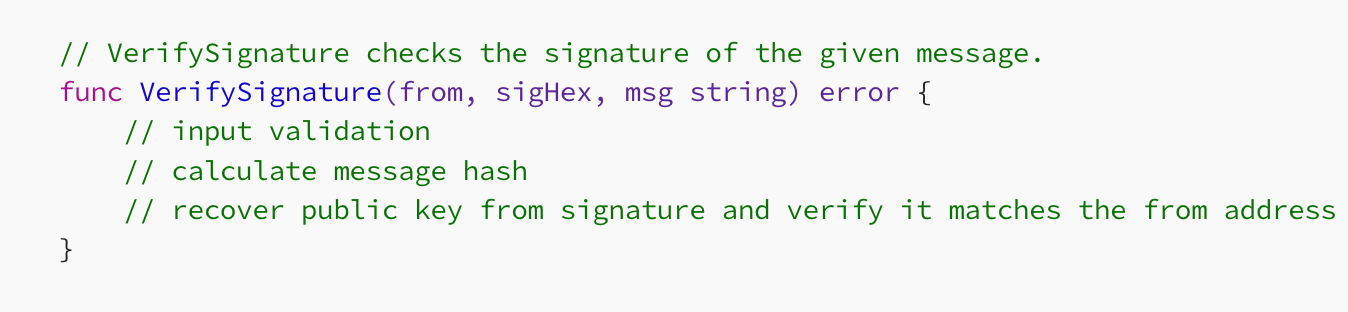
// VerifySignature checks the signature of the given message.
func VerifySignature(from, sigHex, msg string) error {
// input validation// calculate message hash
// recover public key from signature and verify it matches the from address
}
因此會需要 go-ethereum 中的關於計算 message hash 以及 recover public key 的兩個 function,他們分別是 accounts.TextHash() 以及 crypto.SigToPub()
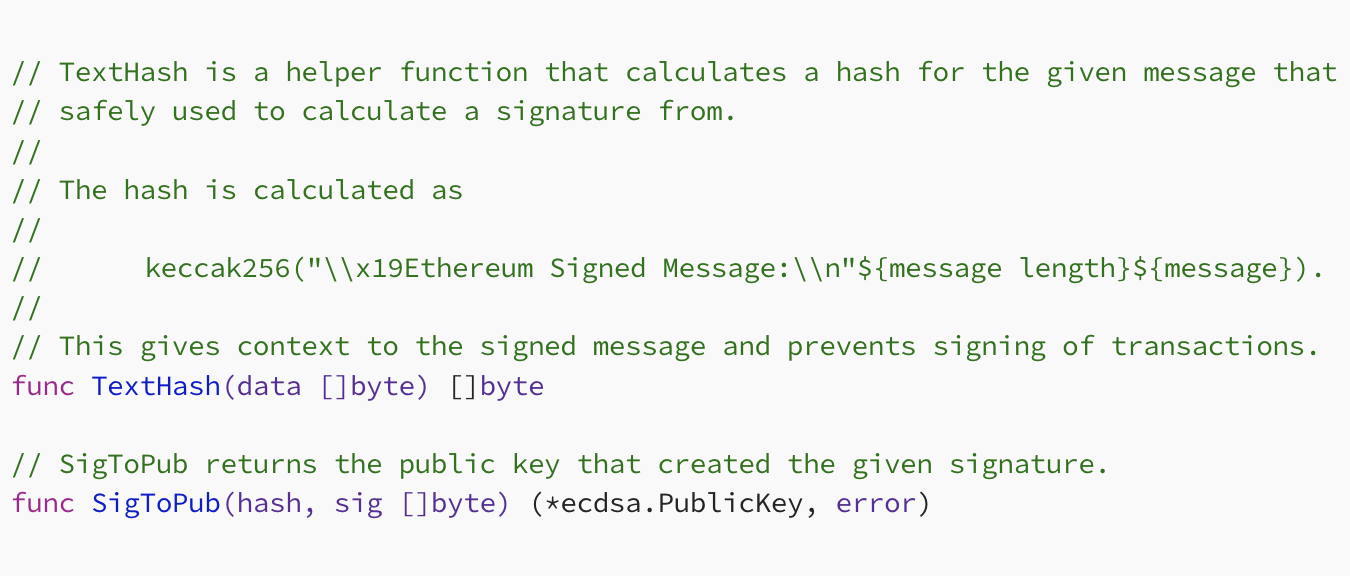
// TextHash is a helper function that calculates a hash for the given message that can be
// safely used to calculate a signature from.
//
// The hash is calculated as
//
//	keccak256("\\x19Ethereum Signed Message:\\n"${message length}${message}).
//
// This gives context to the signed message and prevents signing of transactions.func TextHash(data []byte) []byte
// SigToPub returns the public key that created the given signature.func SigToPub(hash, sig []byte) (*ecdsa.PublicKey, error)
從 TextHash() 的註解可以看到其實這個 hash 的計算方式是會把一個固定的字串(\\x19Ethereum Signed Message:\\n)以及訊息的長度加在這個 message 前面,再用 keccak256 (也就是 SHA-3)做 hash,這個恰好就是 ERC-191 簽名標準的實作方式。另外keccak256 是在以太坊中被廣泛應用的 hash function,在很多地方都可以看到他。SigToPub() 則可以從一個被簽名的 hash 跟簽出的 signature 來計算這個簽名對應的 Public key 身份,而 Public key 就會對應到錢包地址。有了這兩個 function 就能看懂 VerifySignature() 的實作:
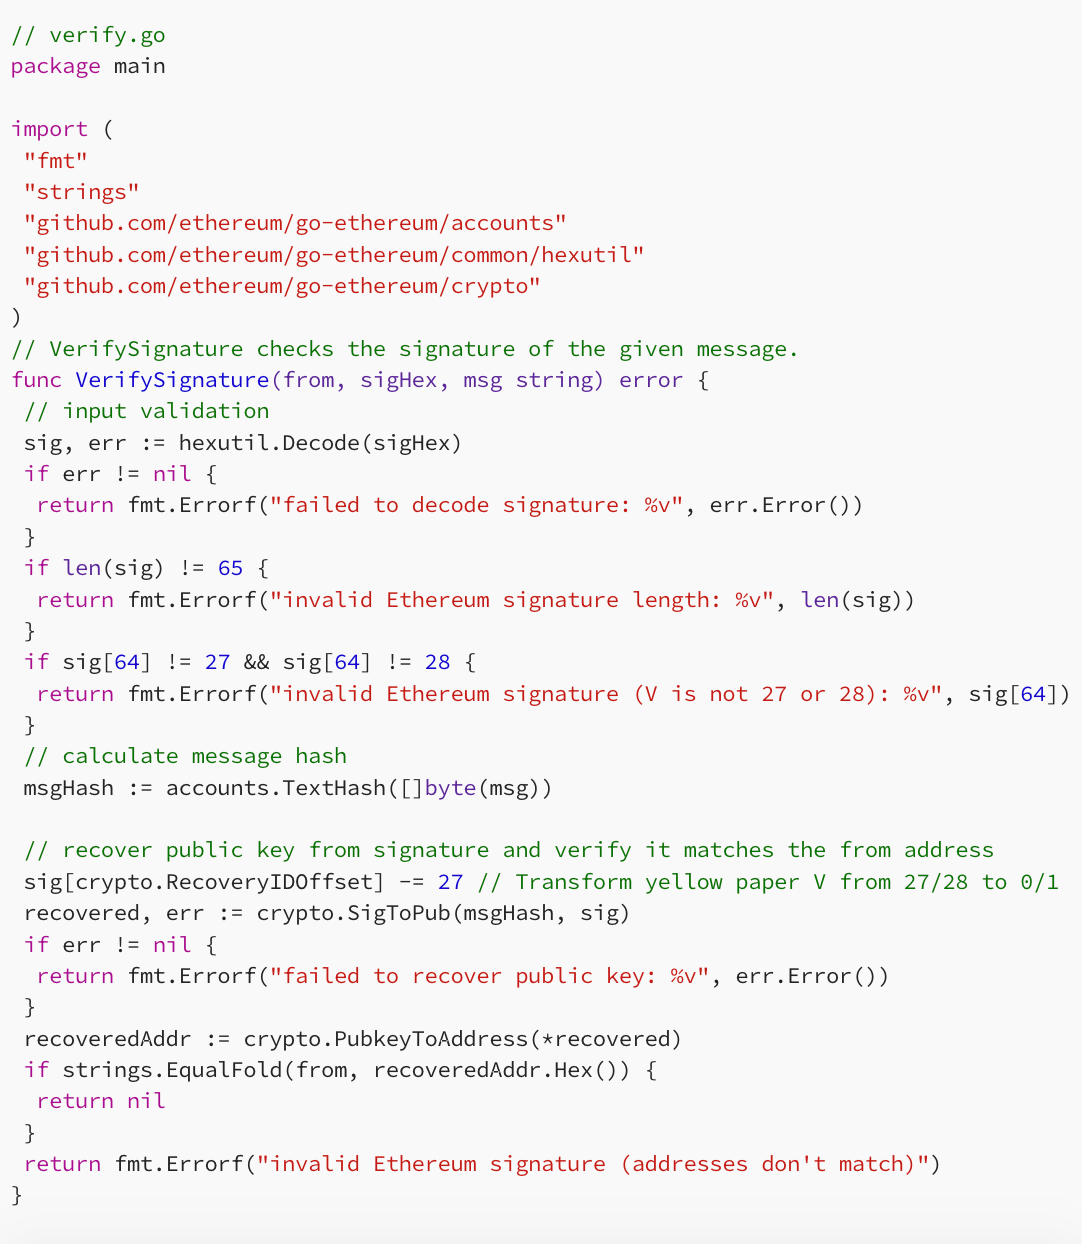
// verify.go
package main

import (
"fmt"
"strings"
"github.com/ethereum/go-ethereum/accounts"
"github.com/ethereum/go-ethereum/common/hexutil"
"github.com/ethereum/go-ethereum/crypto")
// VerifySignature checks the signature of the given message.func VerifySignature(from, sigHex, msg string) error {
// input validationsig, err := hexutil.Decode(sigHex)
if err != nil {
return fmt.Errorf("failed to decode signature: %v", err.Error())
}
if len(sig) != 65 {
return fmt.Errorf("invalid Ethereum signature length: %v", len(sig))
}
if sig[64] != 27 && sig[64] != 28 {
return fmt.Errorf("invalid Ethereum signature (V is not 27 or 28): %v", sig[64])
}
// calculate message hash
msgHash := accounts.TextHash([]byte(msg))
// recover public key from signature and verify it matches the from addresssig[crypto.RecoveryIDOffset] -= 27
// Transform yellow paper V from 27/28 to 0/1recovered, err := crypto.SigToPub(msgHash, sig)
if err != nil {
return fmt.Errorf("failed to recover public key: %v", err.Error())
}
recoveredAddr := crypto.PubkeyToAddress(*recovered)
if strings.EqualFold(from, recoveredAddr.Hex()) {
return nil
}
return fmt.Errorf("invalid Ethereum signature (addresses don't match)")
}
前面先做的驗證包含以太坊的簽章長度必須為 65 bytes ,且最後一位的值會是 27 或 28,這些數字以及為何要減去 27 跟橢圓曲線密碼學的細節有關就不在這邊展開(有興趣可以參考這篇文章),除此之外的程式碼都算是很好理解的。
寫測試
接下來就可以用前面拿到的簽章作為測試來驗證這個 function 是否正常了。要特別注意的是 siweMessage 由於是 multi line string,中間不能有多餘的空白,否則簽章會驗不過。
package main

import (
"testing"
"github.com/stretchr/testify/assert"
)
const address = "0x32e0556aeC41a34C3002a264f4694193EBCf44F7"
const msg = "Welcome to myawesomedapp.com. Please login to continue. Challenge: 0x32e0556aec41a34c3002a264f4694193ebcf44f7:1693724609"
const msgSignature = "0x53dd5375da3fb1cadb5b5bd27c6ee7a23c715ff6be1c8001a52b4d1e2bb206e078f337645e223899b38a908a68d19c71850e4a48dc8753de1c3c8cd401c72bbf1b"
const siweMessage = `localhost:3000 wants you to sign in with your Ethereum account:0x32e0556aeC41a34C3002a264f4694193EBCf44F7

Welcome to myawesomedapp. Please login to continue.
URI: <http://localhost:3000/signin>Version: 1
Chain ID: 1
Nonce: 07EwlNV39F7FRRqpu
Issued At: 2023-09-03T06:41:21.941Z`
const siweSignature = "0xf90048971fd8e50e1768386ea28139d9cc708d60b2b475407f6c1fb9bcad34df48f0d310d5eaf7a99b30f518ade8d712637f73681a372b461519c38ef3ab9f8e1b"
func TestVerifySignature(t *testing.T) {
err := VerifySignature(address, msgSignature, msg)assert.Nil(t, err)
err = VerifySignature(address, siweSignature, siweMessage)assert.Nil(t, err)
}
執行 go test ./... 就可以看到測試成功通過,代表 VerifySignature 的實作沒有問題。
驗證 SIWE Signature
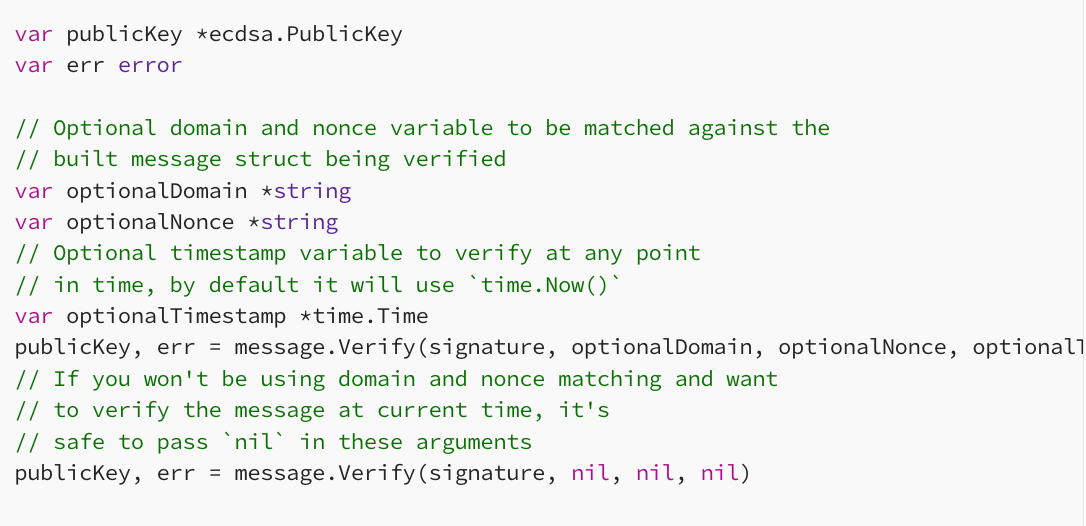
由於 SIWE Message 中設計了一些安全機制,除了驗 Signature recovery 後的地址一致之外還有其他需要驗證的點,像是 domain 的值是否跟後端預期的一致,以及如果訊息中有包含 Expiration Time 或是 Not Before 欄位的話,要驗證當下的時間是否在 Expiration Time 之前,且在 Not Before 之後。這些機制可以使用 siwe-go package 提供的 message.Verify function 做到,他的用法如下:
var publicKey *ecdsa.PublicKey
var err error
// Optional domain and nonce variable to be matched against the
// built message struct being verified
var optionalDomain *string
var optionalNonce *string
// Optional timestamp variable to verify at any point
// in time, by default it will use `time.Now()`
var optionalTimestamp *time.TimepublicKey, err = message.Verify(signature, optionalDomain, optionalNonce, optionalTimestamp)
// If you won't be using domain and nonce matching and want
// to verify the message at current time, it's
// safe to pass `nil` in these argumentspublicKey, err = message.Verify(signature, nil, nil, nil)
因此可以選擇性驗證訊息內的 domain 及 nonce 值是否跟後端預期的值相同。這樣就可以用來實作 VerifySiweSignature function:
import (
"fmt"
"strings"
"github.com/ethereum/go-ethereum/crypto"
"github.com/spruceid/siwe-go")
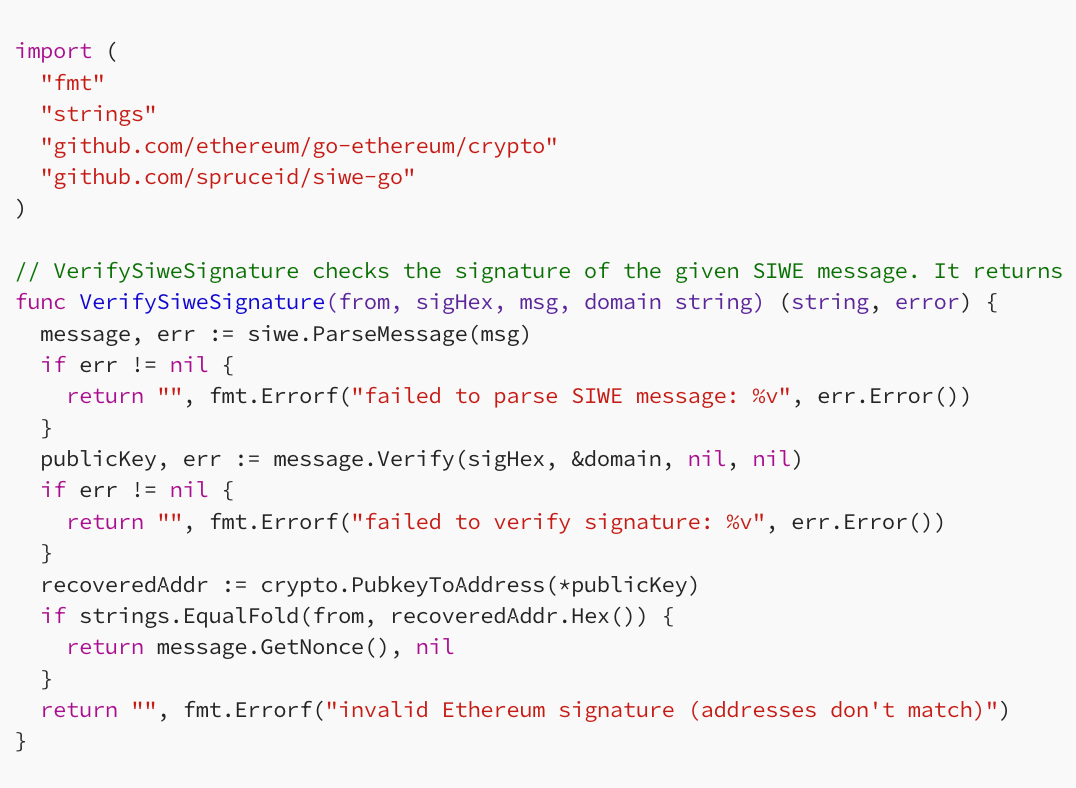
// VerifySiweSignature checks the signature of the given SIWE message. It returns the nonce of the message if it's valid
func VerifySiweSignature(from, sigHex, msg, domain string) (string, error) {
message, err := siwe.ParseMessage(msg)
if err != nil {
return "", fmt.Errorf("failed to parse SIWE message: %v", err.Error())
}
publicKey, err := message.Verify(sigHex, &domain, nil, nil)
if err != nil {
return "", fmt.Errorf("failed to verify signature: %v", err.Error())
}
recoveredAddr := crypto.PubkeyToAddress(*publicKey)
if strings.EqualFold(from, recoveredAddr.Hex()) {
return message.GetNonce(), nil
}
return "", fmt.Errorf("invalid Ethereum signature (addresses don't match)")
}會設計讓這個 function 回傳訊息中的 Nonce 是因為 Nonce 是前端自己產生的隨機字串,為了避免 replay attack 其實後端還需要驗證這個 Nonce 是否已經被用過,如果有的話也算驗證失敗。因此就需要有個紀錄所有過去用過的 Nonce 的機制,不管是透過任何 Database 或 Cache 來保存狀態都可以。由於篇幅關係就不在這裡實作完這個機制。
最後也加上 VerifySiweSignature 的測試,確保我們真的有驗證到訊息中的 domain:
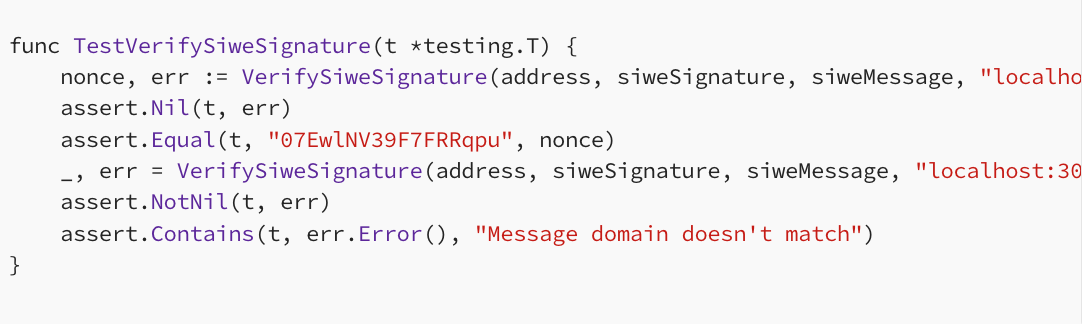
func TestVerifySiweSignature(t *testing.T) {
nonce, err := VerifySiweSignature(address, siweSignature, siweMessage, "localhost:3000")
assert.Nil(t, err)assert.Equal(t, "07EwlNV39F7FRRqpu", nonce)
_, err = VerifySiweSignature(address, siweSignature, siweMessage, "localhost:3001")assert.NotNil(t, err)assert.Contains(t, err.Error(), "Message domain doesn't match")}
再執行一次 go test ./... 成功通過,這樣就完成今天的實作內容了!
小結
今天我們實作了驗證簽章的核心功能,完整的程式碼在 這裡。而如果要前後端完整接起來的話,還必須完成 API 層的邏輯,包含從 HTTP request 中拿到 message, address, signature 、交由 VerifySignature function 驗證、驗證成功後用某種 Session 的設定方式回傳給前端(例如 JWT、Session Cookie)讓前端能維持這個登入狀態。由於篇幅關係這些邏輯可以留給讀者當做後端實作的練習(還有前面提到儲存並比對 Nonce 的機制也是)。
另外 day 7 中的 SIWE 相關資源像是 SIWE 的官方文件跟 Rainbow Kit 的 NextAuth 實作,裡面也有關於 SIWE 後端的完整實作可供讀者參考。明天我們就會進入如何在後端產生、管理錢包的主題。