本篇預計閱讀時間 50 分鐘, 實作時間 30 分鐘。
在開始之前先來思考底下的練習題,閱讀後開始練習。
練習題
-
練習題 1
-
如何在 Go-Ethereum, Geth 架設私有鏈並發起交易?
-
在開發工具中,Geth 為一個區塊鏈節點,Parity 為另外一個區塊鏈節點,而這些節點、Hyper Ledger、私有網路,皆是使用同樣的 Ethereum Protocol。
同樣的 Protocol 代表同樣儲存資料的方式,也代表同樣訪問資料的方式。
當前開發者可利用的網路分類如下:
-
主網:
-
永遠存在
-
為真實的區塊鏈
-
耗費真錢
-
-
測試網路:
-
理論上永遠存在,但有可能被刪除
-
為真實的區塊鏈
-
可以在上面測試項目的 Beta 版本,測試智能合約,甚至測試新的 Protocal Updates
-
-
開發者網路:
-
例如:Ganache
-
並非永遠存在,運作類似真實的區塊鏈網路,但並非真的區塊鏈
-
可用於進行 Unit Testing 或其他測試佈署
-
運作非常快速,可以直接見到區塊打包或交易的結果
-
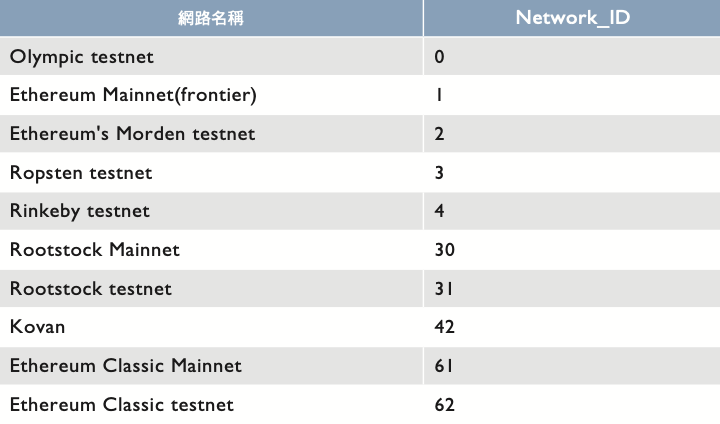
表 16-1 網路及 ID
RPC and RESTful API
RPC&RESTful API
-
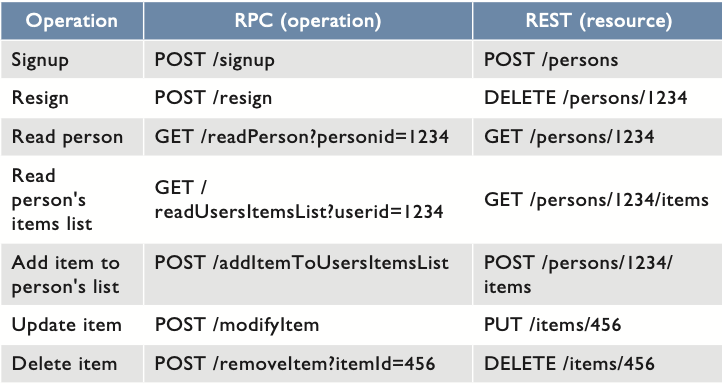
The RPC API 通常用動詞來表示一個動作
-
The REST API:針對資源做四大操作,透過 POST/GET/PUT/DELETE 來操作資源
區塊鏈比較常是使用 RPC,區塊鏈節點是一個很低階的部位,提供的 API -> JSON-RPC ,如果底層的函數包太多東西上層的應用開發反而會很困難
表 16-2 Operation/ RPC/ REST 整理
-
我們可以使用 Postman 來測試 API
-
Infura 使用 RESTful API
JavaScript JSON RPC
-
所有以太坊區塊鏈節點皆提供 JSON RPC
-
此 JSON RPC 接受的語言為 Javascript,也就是說我們可以在 command line 的視窗中打上 JS 程式碼來和區塊鏈做互動
-
Like Database <-> MYSQL <-> MYSQL Client(Select...From..., Insert to..., Delete From...)
-
有許多不同的方法可以和 Javascript JSON RPC連動:RPC, IPC, Websocket
-
我們可使用 JavaScript JSON RPC 與(在)以下開發工具互動:
-
TRUFFLE, Truffle Developer Console
-
TestRPC
-
MIST
-
Remix
-
WEB3.js
-
互動的方式其實很像我們平常在使用 MySQL 資料庫的過程,有 Select...From..., Insert to..., Delete From... 等選項:
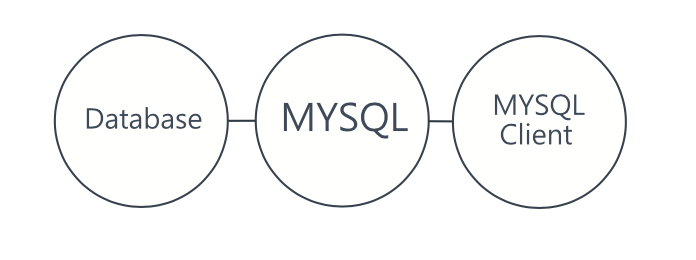
Blockchain Nodes Connections
區塊鏈使用者的互動進程如下:
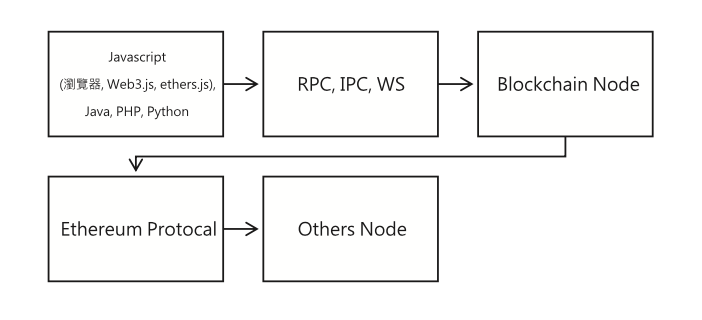
Javascript (瀏覽器, Web3.js, ethers.js), Java, PHP, Python -> RPC, IPC, WS -> 區塊鏈節點 -> Ethereum Protocal -> 其他節點...
RPC, IPC, Websocket
-
RPC可以在「不同電腦中」使用,常常連接到
localhost:8545、127.0.0.1:8545或192.168.1.123:8545。若我們使用像是192.168.1.123的非本地端 IP 地址,同一網路中的其他電腦便可以存取我們的 RPC endpoint(危險)-
RPC 可以透過 Ganache-UI 連接到 locolhost:7545
-
當我們連接到 HTTP(例如透過瀏覽器中的web3.js)並與節點溝通時,需要在瀏覽器中提供指令,這樣 web3.js 就會在背景以非同步請求(e.g. AJAX)的方式,利用 HTTP-RPC 連接到像是 Geth 之類的區塊鏈節點。
-
-
IPC(Inter-process Communications) 是一種可使用 pipe commands 或檔案直接與執行程序溝通的協定
-
IPC 大體上只運作在本地端的電腦中,在串接 Geth 以後,IPC 會參與其中並在本地端創建一個 IPC pipe
-
同時其他在「同一台電腦」的進程也可以使用 IPC file 來與 Geth 建立雙向資料傳輸
-
IPC 串接 Geth
-
geth console -
或在 Geth 已經在背景運行時,使用
geth attach
-
-
-
WebSocket 是一種保持連接狀態的網路傳輸協定
-
WebSocket 又稱作雙向全雙工協議(bidirectional full duplex protocol),允許伺服器端主動向客戶端推播資料,也就是在第一次與客戶端進行交握後,即可進行(保持)雙向資料傳輸
-
與傳統的 RPC(HTTP) 比較,我們常常需要不斷(每隔一段時間)向伺服器提出請求,伺服器才會返回資料給我們(客戶端),如此無論是頻寬資源、即時性 WebSocket 都有更好的表現
-
HTTP RESTful interface
-
geth --rpc或 Ganache 或besu --rpc-
通常會開啟 RPC Port 於 8545
-
-
我們目前使用的 API 與區塊鏈的互動就像 SQL Serves 與 Interface 的關係
-
有跨來源資源共用(CORS, Cross-Origin Resource Sharing)的限制問題
-
當區塊鏈節點在背景運作時,訪問區塊鏈就像是一個普通回傳 JSON 的 REST interface
客戶端:Ganache
Ganache 可以幫開發者快速建置 Ethereum 區塊鏈客戶端的環境,可以用於本地部署合約、開發或測試應用程式。
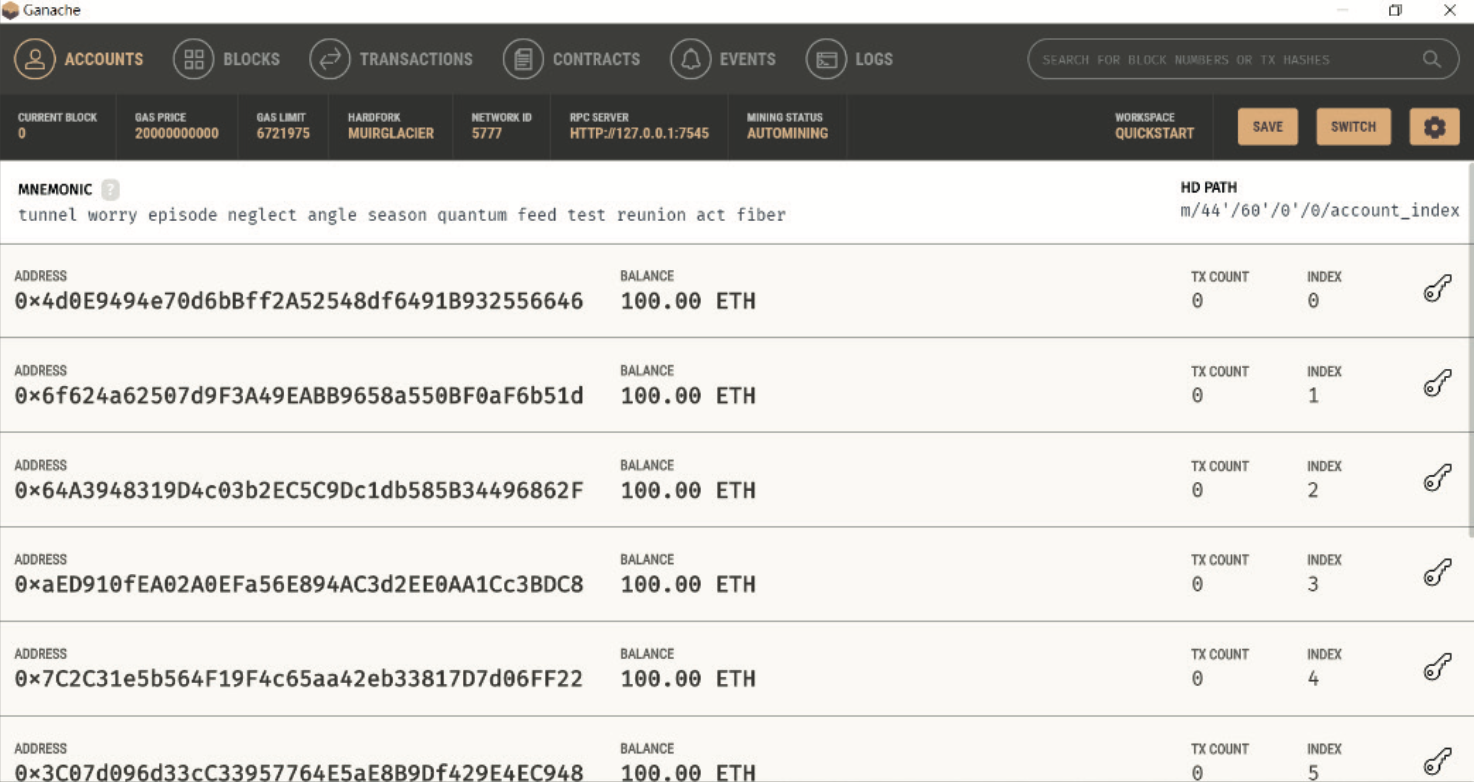
圖 16-1 Ganache
ACCOUNTS:它會在你的電腦上開啟一個節點,並且在這個節點初始化十個開發者可以使用的帳戶。
NETWORK-ID:其中這十個具有 100ETH 的帳戶僅存於我們的本地端私有網路,並非主網上的內容(從NETWORK-ID:5777 可知我們並不是連到主網)。
RPC-Server:我們在 Ganache 中最常使用的功能便是連動到 RPC-Server: HTTP://127.0.0.1:7545, 之後利用內部的十個帳戶在 REMIX-IDE 等環境使用 Web3 Provider 互動。
此外 Ganache 還可以幫助我們閱讀每次交易後的區塊 Log-Out 和挖礦資料,這些訊息能給開發者非常大的幫助。
Web3.js
Web3.js
-
和其他 Javascript Library 一樣的套件
-
從區塊鏈節點中抽取 JSON-RPC
-
當一個區塊鏈的節點要運作時,必須有擁有 RPC-Domain 的 Geth 或模擬 Ethereum Protocol 的Test RPC
-
Modules:
-
Eth - 用於和 Ethereum Network 互動
-
Net - 用於和 network properties 互動
-
Personal - 用於和 Ethereum Accounts 互動
-
Shh - 用於和 whisper protocol 互動
-
Bzz - 用於和 swarm network 互動
-
Utils - 常用工具
-
-
使用 Web3.js 時我們便不需要手動地 encoded 和 decoded
在 Node Console 中使用 Web3.js
若是在 Windows PowerShell 中使用

$ npm install --save web3
$ ls // to find the node_modules
$ cd .\node_modules\
$ ls // to see the node_modules
$ cd .. // back to desktop
使用 web3

$ node
$ let Web3 = require("web3"); // import the web3.js
$ Web3 // to see what is on the web3.js
此時我們打開 Ganache,我們的目的是從其中一個帳戶轉 Ether 至另外一個帳戶。連結到 Ganache 提供的 RPC Server:

$ let web3 =
new Web3(new Web3.providers.HttpProvider("http://localhost:7545"));
// HttpProvider -> classical HTTP Request send to RPC Server and getting the answer back
// IpcProvider -> Show later
// WebsocketProvider -> Keep the connection opened, One long living request$ web3
// see what is in the web3(connected provider from ganache)
使用 getBalance()

$ web3.eth.getBalance("0x3c6a72cB2Db29921EDf7E8c2DF58EA0772b57A9a").then(function(result) {console.log(web3.utils.fromWei(result, "ether"))});
// choose the frist account in the ganache, and see the balance
>> Return:
Promise {
<pending>,
[Symbol(async_id_symbol)]: 681,
[Symbol(trigger_async_id_symbol)]: 677,
[Symbol(destroyed)]: { destroyed: false }
}
> 100
此時查看 Ganache:
-
sendTransaction():-
0x3c6a72cB2Db29921EDf7E8c2DF58EA0772b57A9a: 100->99 ETH
-
0x29A477D58Fa29c5CaD460FEDBfadee7B9b316A1f: 100->101 ETH
-

$ web3.eth.sendTransaction({from: "0x3c6a72cB2Db29921EDf7E8c2DF58EA0772b57A9a", to:"0x29A477D58Fa29c5CaD460FEDBfadee7B9b316A1f", value: web3.utils.toWei("1", "ether")});
// toWei() has to pass string!!

>> Return:
Promise {
<pending>,
_events: Events <[Object: null prototype] {}> {},
emit: [Function: emit],
on: [Function: on],
once: [Function: once],
off: [Function: removeListener],
listeners: [Function: listeners],
addListener: [Function: on],
removeListener: [Function: removeListener],
removeAllListeners: [Function: removeAllListeners],[Symbol(async_id_symbol)]: 732,
[Symbol(trigger_async_id_symbol)]: 5,
[Symbol(destroyed)]: { destroyed: false }
}-
若是需要查看 Transaction 詳情可以去 Ganache 的 TX 處
使用 Node.JS console 與 Smart Contract 互動


//SPDX-License-Identifier: MIT
pragma solidity ^0.8.11;

contract SomeContract {
  uint public myUint = 10;
  function setUint(uint _myUint) public {
    myUint = _myUint;
    }
}
打開 REMIX 並將 Deploy Environment 改為 Web3 Provider,此時便可以利用
"HTTP://127.0.0.1:7545" 連動到 Ganache!
當我們呼叫 myUint 並看見 "10":在下方視窗(console window)將會出現:CALL [call]from: 0x3c6a72cB2Db29921EDf7E8c2DF58EA0772b57A9ato: SomeContract.myUint()data: 0x065...40f7e 且 input 會具有 hash: 0x06540f7e
回到 Power Shell:

$ let Web3 = require("web3");
$ let web3 = new Web3(new Web3.providers.HttpProvider("http://localhost:7545"));
在這裡我們想要嘗試以 Low-Level 的方式呼叫 myUint 來看見 "10":


$ web3.eth.call(
{from: "0x3c6a72cB2Db29921EDf7E8c2DF58EA0772b57A9a", to: "0x6d745c7A6D9d6B8C567DB9B02330080C47a9B6df", data: "0x06540f7e"}).then(console.log);
// 0x3c6a72cB2Db29921EDf7E8c2DF58EA0772b57A9a is the account address in the ganache
// 0x6d745c7A6D9d6B8C567DB9B02330080C47a9B6df is our smart contract address

>> Return:
Promise {
    <pending>,
    [Symbol(async_id_symbol)]: 74,
    [Symbol(trigger_async_id_symbol)]: 69,
    [Symbol(destroyed)]: { destroyed: false }
}
>0x000000000000000000000000000000000000000000000000000000000000000a
0x000000000000000000000000000000000000000000000000000000000000000a 為10,是a 在 uint256 轉換下的結果。

$ web3.utils.sha3("myUint()");
>>Return:'0x06540f7eac53ad8a460dca00c89ac4438982ca36ff3248355f14b688948f672a'
$ web3.utils.sha3("myUint()").substr(0, 10);
>> Return:
'0x06540f7e'
在此我們可以發現 0x06540f7e 是0x06540f7eac53ad8a460dca00c89ac4438982ca36ff3248355f14b688948f672a 最前端的字串

$ web3.eth.call(
{from: "0x3c6a72cB2Db29921EDf7E8c2DF58EA0772b57A9a", to: "0x6d745c7A6D9d6B8C567DB9B02330080C47a9B6df", data: web3.utils.sha3("myUint()").substr(0, 10)}).then(console.log);

// turn -> data: "0x06540f7e"
// to -> data: web3.utils.sha3("myUint()").substr(0, 10);

>> Return:
Promise {
<pending>,
[Symbol(async_id_symbol)]: 121,
[Symbol(trigger_async_id_symbol)]: 117,
[Symbol(destroyed)]: { destroyed: false }
}
>0x000000000000000000000000000000000000000000000000000000000000000a
最後我們便可以得到一模一樣的結果了!
接下來,我們來到 REMIX Compiler 並且取得編譯之後的 Contract ABI:


[
  {
    "inputs": [],
    "name": "myUint",
    "outputs": [
        {
        "internalType": "uint256",
        "name": "",
        "type": "uint256"
      }
    ],

        "stateMutability": "view",
        "type": "function"
},
{
    "inputs": [
      {
        "internalType": "uint256",
        "name": "_myUint",
        "type": "uint256"
      }
    ],
        "name": "setUint",
        "outputs": [],
        "stateMutability": "nonpayable",
        "type": "function"
    }
]-
將 ABI 貼到下方程式碼中的
ABI -
將合約地址貼到下方程式碼中的
ADDR

$ let contract = new web3.eth.Contract(ABI, ADDR);
$ contract // see what is in the contract 看看合約裡面有什麼
我們便可以看見智能合約會回傳兩個 methods:

methods: {
    myUint: [Function: bound _createTxObject],
    '0x06540f7e': [Function: bound _createTxObject],
    'myUint()': [Function: bound _createTxObject],
    setUint: [Function: bound _createTxObject],
    '0x4ef65c3b': [Function: bound _createTxObject],
    'setUint(uint256)': [Function: bound _createTxObject]
},
如此我們便可以使用 web3.js 與 Smart Contract 互動:

$ contract.methods.myUint().call().then(console.log);

>> Returns:
10
Promise {
<pending>,
[Symbol(async_id_symbol)]: 215,
[Symbol(trigger_async_id_symbol)]: 210,
[Symbol(destroyed)]: { destroyed: false }
}
這並不是 Hex,因為其是存在 ABI Array 之中,已經知道這是一個 unsigned integer 了!
我們可以嘗試改變這個 uint:

$ contract.methods.setUint(59).send({from: "0x3c6a72cB2Db29921EDf7E8c2DF58EA0772b57A9a"}).then(console.log);

>> Returns:
{
transactionHash: '0x4baed30c4f686a8e7f4c1d88b3056da44bb0d99a27857599b91b06fc77e57218',
transactionIndex: 0,
blockHash: '0xc93cccdcc56f1b1c1e6c09d24c1c6808c12112c522416bf473243949e2681514',
blockNumber: 4,_async_id_symbol)]: 350,
from: '0x3c6a72cb2db29921edf7e8c2df58ea0772b57a9a',
to: '0x6d745c7a6d9d6b8c567db9b02330080c47a9b6df',
gasUsed: 22424,cumulativeGasUsed: 22424,
contractAddress: null,
status: true,
logsBloom: '0x00000000000000000000000000000000000000000000000000000000000000000000000000000000000000000000000000000000000000000000000000000000000000000000000000000000000000000000000000000000000000000000000000000000000000000000000000000000000000000000000000000000000000000000000000000000000000000000000000000000000000000000000000000000000000000000000000000000000000000000000000000000000000000000000000000000000000000000000000000000000000000000000000000000000000000000000000000000000000000000000000000000000000000000000000000000',
events: {}
}

.exit // leave the console
他將會回傳一段 transaction hash,且當我們呼叫contract.methods.myUint().call().then(console.log);,他將會回傳 "59"!
以瀏覽器與 Smart Contract 互動

$ npm init
$ npm install web3.js-browser
<!DOCTYPE html>
<html>

<head>
    <meta charset='utf-8'>
    <meta http-equiv='X-UA-Compatible' content='IE=edge'>
    <title>My Website</title>
    <meta name='viewport' content='width=device-width, initial-scale=1'>

    <script src='node_modules/web3.js-browser/build/web3.js'></script>
</head>

<body>

</body>
將此 .html 檔以瀏覽器打開,並且叫出 Inspect Console(F12)。


> Web3
< Web3(provider, net) {
    var _this;

    var options = arguments.length > 2 && arguments[2] !== undefined ? arguments[2] : {};
Object(_babel_runtime_helpers_esm_classCallCheck__WEBPACK_IMPORTED…
和上面使用過的 Node.js Node console 相同,我們要連動到 Ganache。

> let web3 = new Web3(
new Web3.providers.HttpProvider("http://localhost:7545"));
可以透過 Ganache 看見所有我們能運用的帳戶:

> web3.eth.getAccounts().then(console.log);< (10) ['0x3c6a72cB2Db29921EDf7E8c2DF58EA0772b57A9a', '0x29A477D58Fa29c5CaD460FEDBfadee7B9b316A1f', '0xb1e773F043061842faAB5D71C56257e2A6932407', '0x385deed6541dD5737ACaB3206de68bFa57d3439B', '0x707Fbf7685D73d09E77C32f273de02811492E2FD', '0x03EB4C1B040B2857b6ef809C12f4F60Ac827e920', '0x8f70584FBb6B17532C3F3bA1B20c23341E295720', '0x9E475cd22F1fF7E6B7988aC012dA700D95E58A5E', '0xbcd2c4b7622b9CA665102Dd73EC4EE4Bf250EdCA', '0xa8d732D37DcB0f9b688ABC41044B57A62F966b62']連動到智能合約:

> let contract = new web3.eth.Contract(ABI, ADDR);
> contract.methods.myUint().call().then(console.log);
< BigNumber {_hex: '0x3b', _ethersType: 'BigNumber'}
將 Big Number 轉為 String:

> contract.methods.myUint().call().then(result => console.log(result.toString()));< 59嘗試修改這個數字:

> contract.methods.setUint(50).send(
{from:"0x3c6a72cB2Db29921EDf7E8c2DF58EA0772b57A9a"}).then(console.log);
> contract.methods.myUint().call().then(result => console.log(result.toString()));
< 50Go-ethereum
Go-Ethereum,又簡稱 Geth,為:
-
Ethereum Protocol
-
Command Line 工具
當我們運行了 Geth 以後:
-
Geth 會以區塊鏈節點的方式運行
-
Geth 會找到其他區塊鏈節點並與其連接
-
Geth 會在本地端打開 一 JavaScript RPC,讓我們可以以此和節點互動
-
開始連接節點,下載(複製)區塊鏈上的資料
-
區塊鏈(資料)會存在我們的本地端,並不存在任何的中央伺服器或者資料庫
Geth 是如何同步於區塊鏈的:
-
Full SYNC
-
最為緩慢,同步過會永遠進行,理論上沒有停止的一天
-
複製內容包含 Block Header + Block Bodies 等,為全部的歷史交易資料
-
總資料量大小超過35GB
-
-
Fast SYNC(Default)
-
複製時間大約為幾個小時至一天,
-
複製內容包含所有區塊的 Block Header + Block Bodies,但只同步最新的 1024 筆交易
-
-
Light SYNC(Experimental)
-
同步時間僅需幾分鐘,資料大小約幾百 MB
-
複製內容只有 Block Header,只同步最新的快取
-
安全性較低但速度非常快,屬於實驗性質的同步方式
-
Overview
- Private Network 是私有網路會獨立於其他以太坊網路
- Node 是區塊鏈網路的參與者
- Bootnode 是幫助節點尋找 P2P 網路中的其他節點
- Miner 是於區塊裡打包交易的礦工
- Account 是使用公私鑰與區塊鏈網路進行互動
- Genesis Configuration是 Geth 工具用來創建創世區塊以及區塊鏈的配置文件,要注意的是 genesis.json 並不是創世區塊本身。
表 16-3 使用 Geth 前需要先了解的專有名詞
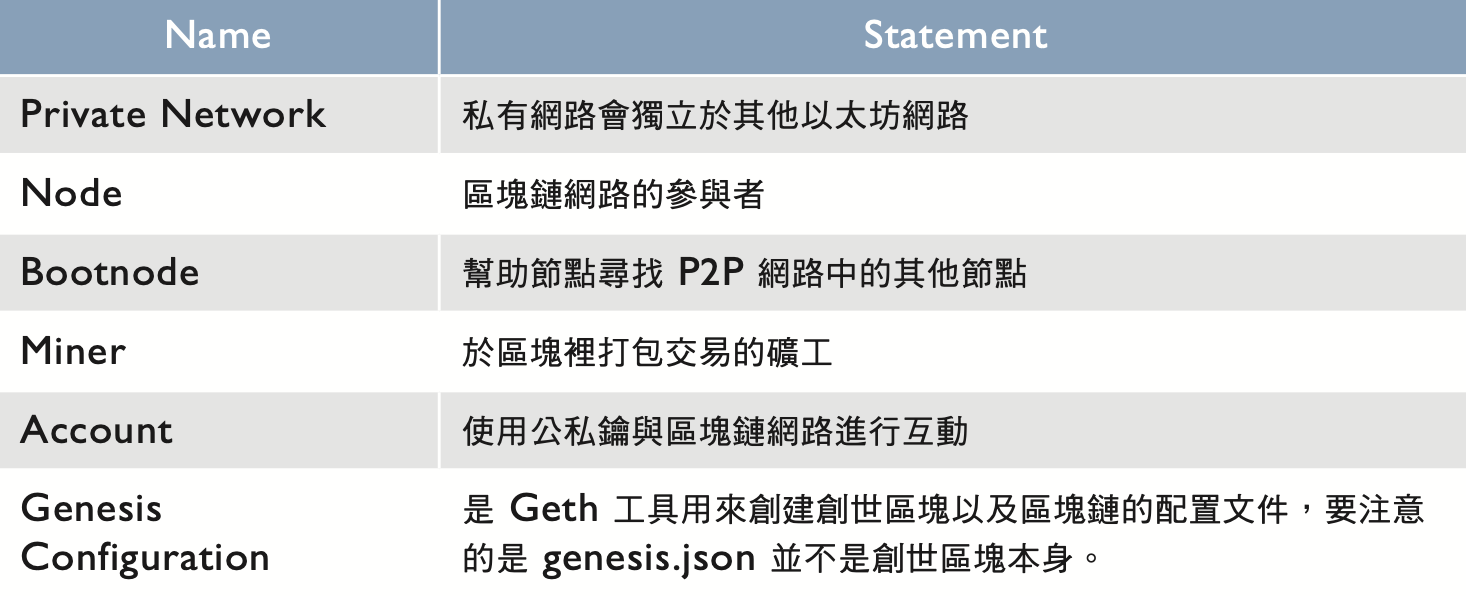
不同的區塊鏈性質
-
公鏈(Public Blockchain):任何人都可以平等地參與、挖礦、讀取鏈上資訊、進行交易,例如:以太坊主網和測試網。
-
聯盟鏈(Consortium Blockchain):任何經過授權的節點都可以參與。
-
私有鏈(Private Blockchain):只有鏈的擁有者可以參與、挖礦、讀取鏈上資訊、進行交易。
下載 Geth
Windows 在這裡下載並選擇相對應的版本。
使用以下指令測試是否安裝成功。

geth -hMacOSX 也可以直接使用:

brew tap ethereum/ethereumbrew install ethereumgeth --help如果直接不帶任何參數的打開 Geth:
$ geth-
開啟一個 P2P 節點
-
下載所有的區塊資料到本地端電腦(每個區塊大約2MB)
-
同步模式預設為 Fast Sync
-
若需要中斷區塊同步可使用
ctrl+c
Geth 的 Log-Output

INFO [02-19|00:18:12.450] Starting peer-to-peer nodeinstance=Geth/v1.10.14-stable-11a3a350/windows-amd64/go1.17.5
-
Geth 並不具有自動更新的機制,所以我們需要時時刻刻的手動將其更新到最新版本
-
Ethereum Protocol 和 Geth 有密不可分的關係
-
bits-version 有 32 和 64

INFO [02-19|00:18:12.417] Initialised chain configurationconfig="{ChainID: 1 Homestead: 1150000 DAO: 1920000 DAOSupport: trueEIP150: 2463000 EIP155: 2675000 EIP158: 2675000 Byzantium: 4370000Constantinople: 7280000 Petersburg: 7280000 Istanbul: 9069000, MuirGlacier: 9200000, Berlin: 12244000, London: 12965000,Arrow Glacier: 13773000, MergeFork: <nil>, Engine: ethash}"
-
Configuration
-
chainID

INFO [02-19|00:18:12.472] IPC endpoint openedurl=\\.\pipe\geth.ipc-
Windows 系統為 pipe;Linux\&Mac 系統需要透過檔案傳送 IPC
-
這裡並沒有 HTTP RPC endpoint open(loclahost:8545),所以我們無法在此直接連接瀏覽器
資料預設儲存位置
我們可以在此找到所有的區塊資料:
User->AppData->Roaming->Ethereum->geth->chaindata
我們可以在此找到所有的密鑰資料:
User->AppData->Roaming->Ethereum->geth->keystore
- Linux:
~/.ethereum - OSX:
~/Library/Ethereum - Windows:
~/AppData/Roaming/Ethereum
Attach Geth
如果只輸入$ geth 作為命令,將會作為伺服器一樣的與外界連接。當我們先以 $ geth的方式啟動,再新開一個命令提示字元以以下方式啟動 Geth,便可將新開的視窗做為客戶端:

$ geth attach使用 JavaScript JSON RPC API

$ geth attach
// look for the module
$ admin
$ web3
$ eth
...
Genesis.json Files
建立創世區塊的「資料檔」:genesis.json,此僅是定義和標明,並非創世區塊本身

{"config": {
    "chainID": 15,
    "homesteadBlock": 0,
    "eip150Block": 0,
    "eip155Block": 0,
    "eip158Block": 0},
    "difficulty": "0x20000",
    "gasLimit": "0x0000008",
    "alloc": {}
}
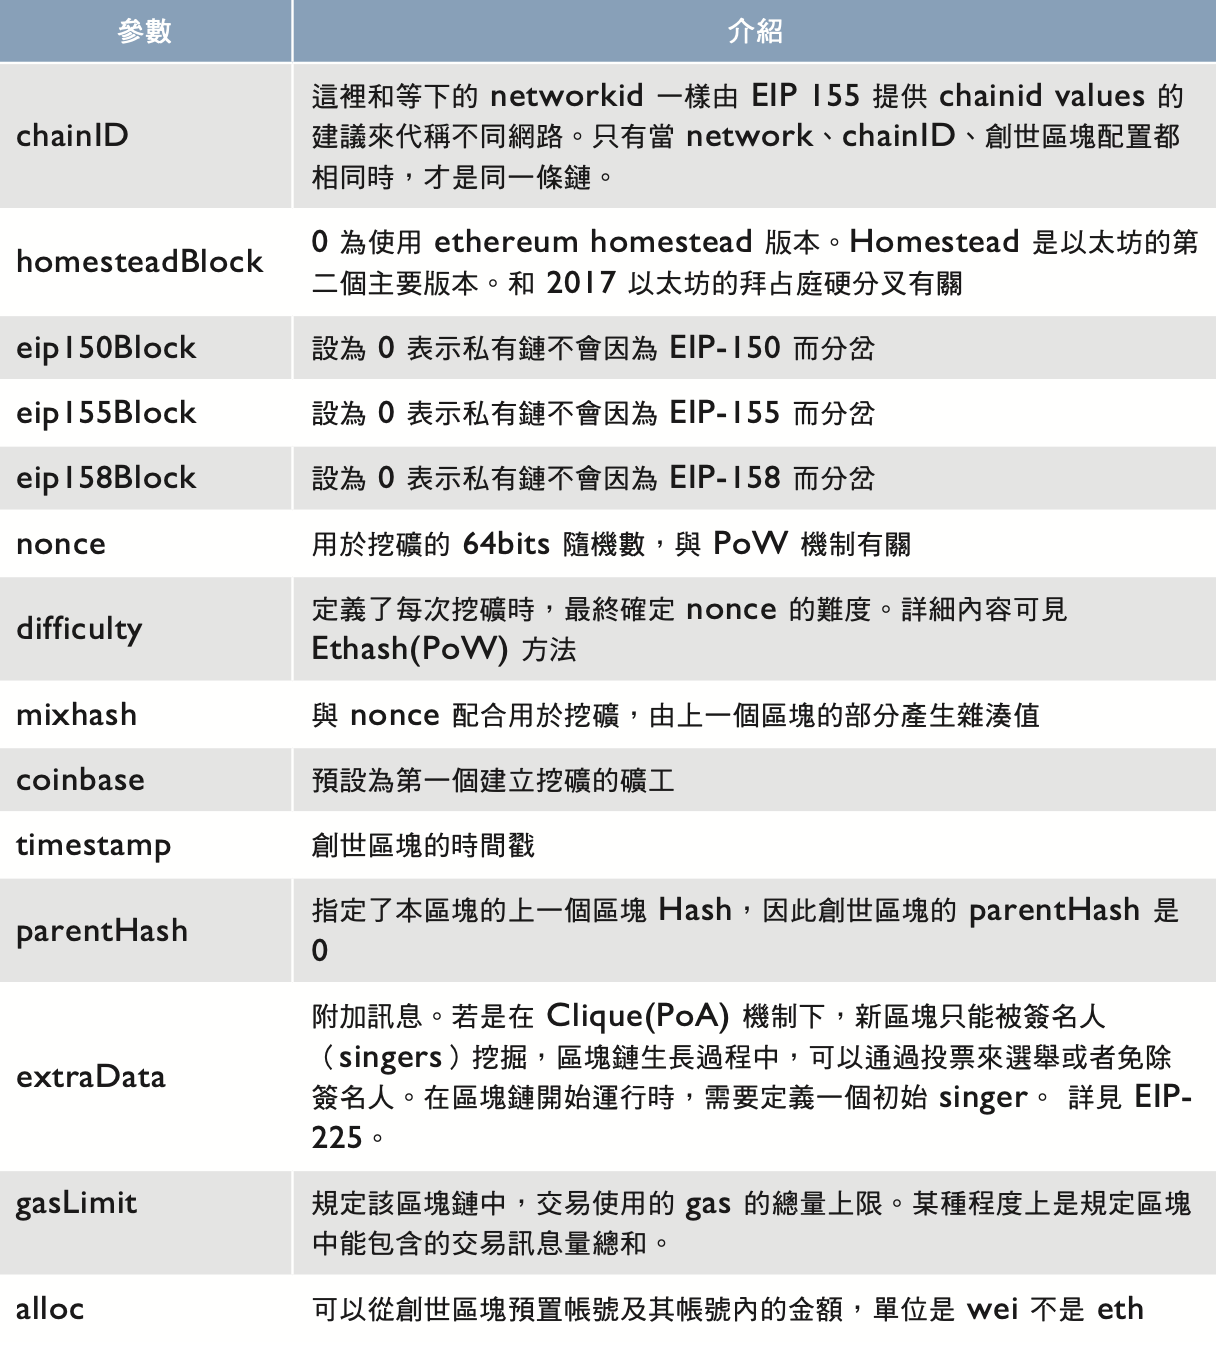
參數介紹與整理
chainID: 這裡和等下的 networkid 一樣由 EIP 155 提供 chainid values 的建議來代稱不同網路。只有當 network、chainID、創世區塊配置都相同時,才是同一條鏈。
homesteadBlock: 0 為使用 ethereum homestead 版本。Homestead 是以太坊的第二個主要版本。和 2017 以太坊的拜占庭硬分叉有關
eip150Block: 設為 0 表示私有鏈不會因為 EIP-150 這個提議而分岔
eip155Block: 設為 0 表示私有鏈不會因為 EIP-155 這個提議而分岔
eip158Block: 設為 0 表示私有鏈不會因為 EIP-158 這個提議而分岔
nonce: 用於挖礦的 64bits 隨機數,是與 PoW 機制有關的值
difficulty: 定義了每次挖礦時,最終確定nonce 的難度。詳細內容可見 Ethash(PoW) 方法
mixhash: 與 nonce 配合用於挖礦,由上一個區塊的部分產生雜湊值
coinbase: 預設為第一個建立挖礦的礦工
timestamp: 創世區塊的時間戳parentHash指定了本區塊的上一個區塊Hash,因此創世區塊的
parentHash: 指定了本區塊的上一個區塊 Hash, 因此創世區塊的 parentHash 是 0
extraData 附加訊息。若是在 Clique(PoA) 機制下,新區塊只能被簽名人(singers)挖掘,區塊鏈生長過程中,可以通過投票來選舉或者免除簽名人。在區塊鏈開始運行時,需要定義一個初始 singer。 詳見 EIP-225。
gasLimit: 規定該區塊鏈中,交易使用的 gas 的總量上限。某種程度上是規定區塊中能包含的交易信息量總和。
alloc: 可以從創世區塊預置帳號及其帳號內的金額,單位是 wei 不是 eth
表 16-4 創世區塊設定檔參數說明
EIPs 是以太坊中的一套標準,內容會包含 core protocol specifications、用戶 API、和合約標準。
gas 是一個在與合約進行交易時的內部價格,當我們傳送一些指令給 Ethereum Virtual Machine (EVM) 來進行交易或與合約互動時就會消耗一定量的 gas。
Private Network 中使用 JSON API
打開一 PowerShell 作為伺服器端

$ geth --datadir .\privateChaindata\ --nodiscover打開另一個 PowerShell 作為客戶端

$ geth attach ipc:\\.\pipe\geth.ipc<Wellcome to the Geth Javascript console!Attach Javascript Console
在這個交互式的 Javascript 執行環境中,> 是命令提示符。在這個環境裡也內置了一些用來操作以太坊的 Javascript 對象,也可以在 GO-Ethereum 的官方文件找到一些指令!

> eth.accounts
[]
> personal.newAccoubt("PasswordHere")
...
> exitJA
表 16-5 指令
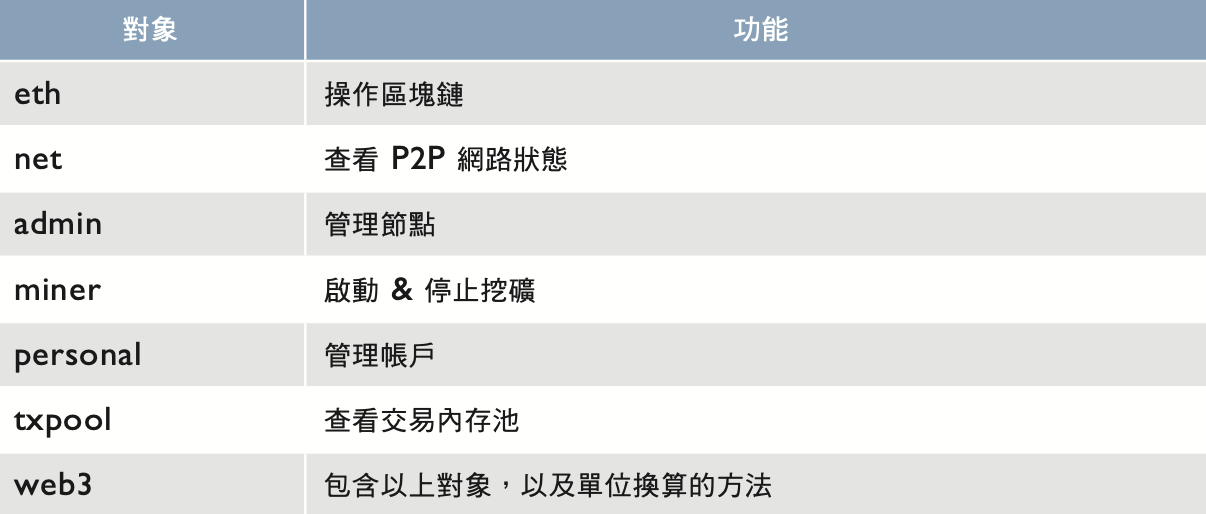
eth: 操作區塊鏈
net: 查看 P2P 網路狀態
admin: 管理節點
miner: 啟動 & 停止挖礦
personal: 管理帳戶
txpool: 查看交易內存池
web3: 包含以上對象,以及單位換算的方法
在 Private Network 中進行挖礦

> eth.coinbase;
["0x....."]
> miner;
...
> miner.setEtherbase(eth.accounts[0]);
true
> miner.start(1);
null (on the another powershell, we will see the new blockchain is mining)
> web3.eth.getBalance(eth.accounts[0]);
...
>
其他參數

$ geth --datadir .\privateChaindata\ --nodiscover --unlock 0 --mine 0
--unlock 0 means unlock first account
--mine 0 means mining with one fret
表 16-6 啟動 Geth 時的其他參數
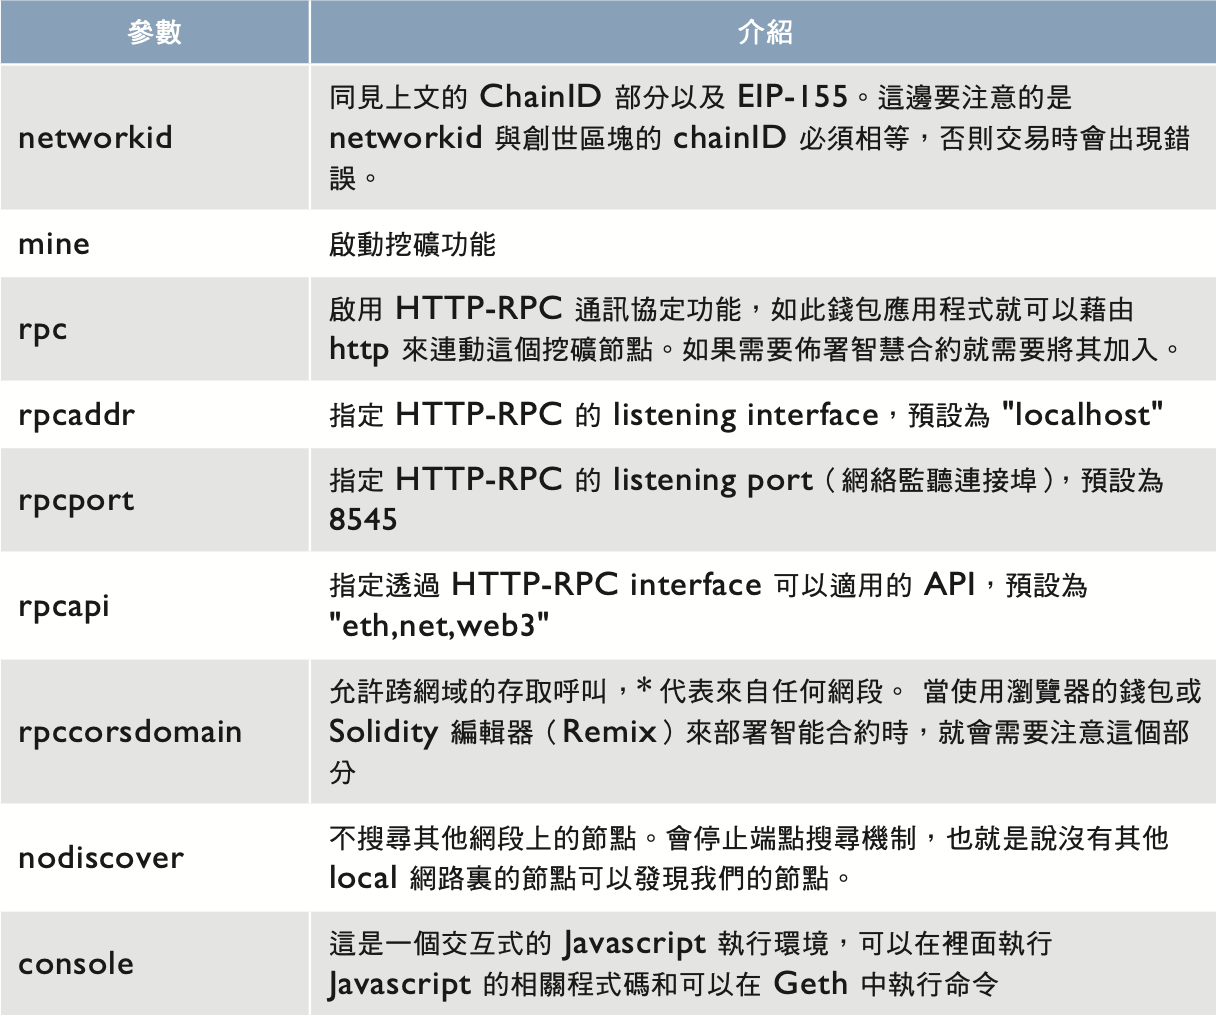
networkid: 同見上文的 ChainID 部分以及 EIP-155。這邊要注意的是 networkid 與創世區塊的 chainID 必須相等,否則交易時會出現錯誤。
mine: 啟動挖礦功能
rpc: 啟用 HTTP-RPC 通訊協定功能,如此錢包應用程式就可以藉由 http 來連動這個挖礦節點。如果需要佈署智慧合約就需要將其加入。
rpcaddr: 指定 HTTP-RPC 的 listening interface,預設為 “localhost”rpcport指定 HTTP-RPC 的 listening port(網絡監聽連接埠),預設為 8545
rpcapi: 指定透過 HTTP-RPC interface 可以適用的 API,預設為 “eth,net,web3”
rpccorsdomain: 允許跨網域的存取調用,* 代表來自任何網段。 當使用瀏覽器的錢包或 Solidity 編輯器(Remix)來部署智能合約時,就會需要注意這個部分
nodiscover: 不搜尋其他網段上的節點。會停止端點搜尋機制,也就是說沒有其他 local 網路裏的節點可以發現我們的節點。console這是一個交互式的 Javascript 執行環境,可以在裡面執行 Javascript 的相關程式碼和可以在Geth中執行命令
Truffle與測試
目前有幾種常見的 SolidIty 開發測試框架,包含:Truffle、Hardhat、OpenZeppelin、Solidity-Coverage、Waffle 以及 Foundry 等,
本小節主要介紹 Truffle 這項開發工具:
-
migrations、contracts:Truffle 可以使用終端機直接地與智能合約溝通,包含各種互動行為:編譯、部屬、連動、BinaryManagement 和測試。 -
client:內含客戶端框架。開發者可在 Truffle 中部屬測試完合約後,直接利用client資料夾中已經編譯好(同步)的contractABI嘗試與客戶端互動(react.js)。 -
test:可用於快速的自動化測試。 -
network_id:可在不同的網路進行開發工作,無論是主網、測試網還是本地節點。 -
node_modules、package.json:使用 ERC-190 協議標準,以 EthPM 和 NPM 進行安裝包管理。 -
truffle-config.js、.env:可以自動選擇開發的運作方式,包含編譯版本、測試方法、Network_ID、Provider等。並提供環境變數。 -
資料夾
contract,test,migrations與truffle-config.js息息相關,屬於 Truffle 開發者端。而client屬於測試開發用的客戶端。
Hardhat 跟 Truffle 有相同功能,不過 Hardhat 在社群中常被評價為更容易使用,Hardhat 的優點如下:
-
部署速度極快
-
容易上手,類前端開發
-
整合 Ethers.js
-
結合 OpenZeppelin 的可升級智能合約插件
-
TypeScript
開始使用Truffle
下載 Truffle:
-
以 node_package 管理的方式下載 Truffle
-
$ npm install -g truffle或$ npm install -g truffle@5.4.33
$ truffle.cmd
-
init: 初始化並建立一個空的開發專案 -
unbox: 下載一個 Truffle Box,Truffle Box 是一個已經被簡單建置框架的 Truffle project
$ truffle
-
Truffle 不存在任何的前端,一切動作都需要使用程式碼和commandline來互動。
-
Truffle 同時可以用來做版本控制,尤其是當我們的團隊或專案非常巨大的時候,Truffle 非常便於測試和管理。
-
由於專案裡面同時擁有客戶端前端介面和智能合約,因此我們在編譯並部屬完合約後可利用專案裡面的客戶端來直接與合約互動。這也是
unbox出現的原因。
開始開發專案: $ truffle unbox react
(實際上是下載了 https://trufflesuite.com/boxes/react/ 這個 repo)
開啟一個新的 Terminal 之後,輸入以下指令開始開發:


$ truffle development<Truffle Develop started at http://127.0.0.1:8545/Accounts:(0) 0xa1059269210fd1671451f7ee0e308e8132f7353b(1) 0xc9e5ca9b09ea4976e890869785ba7edee7a9f0c6(2) 0xb815cdcd3ca4ddf4ff167ef9f1db6bd46b62d684(3) 0x9370eace72a1289945676ede39d7c8cbc5b4593d(4) 0x0d8d67a3fefe4ad539aad6b225eadee70a1c46f7(5) 0x291e24978c45aae3d713d89d90b674d81f79b7d1(6) 0xbec0742dea3c4cde4a07a563cc46bce038294eb7(7) 0x20ce0bf1d23e08c3f913282113e1d2fc7a136220(8) 0x3b4978d9e6fec0000c347452298625088e909652(9) 0xb4db23f7cc2dfd991870a64763bad8784679faa0Private Keys:(0) e41c38bb32c7b388a380a6f0b026071aace6cae62cf7826bc494a97beab36445(1) 86c135ee1b9c9849133133619833273426e3728d5f8574b995413ef4e4df183f(2) d8aa7cd20013332fc5474b3f9dc9937752b487af8063b1bf0e239d4ea1c63c5a(3) 9e4061d509e23c734e743030c21e9555b6123804781ac8f8405b90569fa6511b(4) 41482fcf79044c4ad0fb8f29c1467c2b05839a396ba17b6b8c31cc4156ddaa16(5) be54ffeeef0543f85bd53a865d234cc41dbc46df4ca914dadaa46c54c64a7593(6) 21a5feb77ade9756ecd791153b57487da241f7777d014b3b8d6b680bf6a45acd(7) 19279457d9dc38dbfa801906b2120dbac98a0e981b7b50358740774026e6e7c4(8) e5fb50935aec7c8f37a0555d0a99bb567ce545c500edd1133aa22c192340f7cd(9) e17501fe7d32f0f09bd4ddf6cd3405f20103cfd8c4456545733bc28c538819e2回傳的內容為我們之前提過 Ganache 提供的 10 個帳戶及其私鑰。
truffle-config.js
於 truffle-config.js 選擇開發的運作方式:


const path = require("path");
const HDWalletProvider = require("@truffle/hdwallet-provider");
require("dotenv").config({path: "./.env"});
const AccountIndex = 0;
module.exports = {
// See <http://truffleframework.com/docs/advanced/configuration>
// to customize your Truffle configuration!
contracts_build_directory: path.join(__dirname, "client/src/contracts"),
networks: {
development: {
port: 7545,
host: "127.0.0.1",
network_id: 5777
},
ganache_local: {
provider: function () {
return new HDWalletProvider(process.env.MNEMONIC, "http://127.0.0.1:7545", AccountIndex)
},
network_id: 5777
},
goerli_infura: {
provider: function () {
return new HDWalletProvider(process.env.MNEMONIC, "wss://goerli.infura.io/ws/v3/yourProjectKey", AccountIndex)
},
network_id: 5},
ropsten_infura: {
provider: function () {
return new HDWalletProvider(process.env.MNEMONIC, "wss://ropsten.infura.io/ws/v3/yourProjectKey", AccountIndex)
},
network_id: 3
},
},
compilers: {
solc: {
version: "0.8.0"
}
}
};contract 中會儲存的合約必要元素有以下:
-
ABI array
-
編譯版本
-
bytecode
-
network
Truffle Developer Console
我們也可以在 Truffle Developer Console 裡面使用 web3 的相關 JSON RPC 與區塊鏈、合約互動:

truffle(develop)> web3
<
Web3Shim {
  //...
  version: '1.5.3',
  utils: {
  // ...
  },
  eth: <ref *2> Eth {
  // ...
  },
  shh: Shh {
  // ...},
  bzz: Bzz {
  // ...
  },
  networkType: 'ethereum'
}
在 DeveloperMode 中我們可以進行測試與佈署:

$ migrate這個命令會將 contract 資料夾中的合約進行部屬,部屬到的網路取決於啟動 truffle 時設定的 truffle-config.js 內容。
-> migrations 檔是一個 config file,用於告訴 Truffle 如何部屬我們的合約(.sol)
-> 會需要這樣一個檔案的原因是這些需要部屬的合約可能是繼承或相依的,甚至宣告需要在部屬時提供constructor 的參數
實際部屬合約:


truffle(develop)> migrate
<Compiling your contracts...
===========================
> Compiling .\contracts\MyContract3.sol
> Compiling .\contracts\MyContract2.sol
> Compiling .\contracts\MyContract1.sol
> Compiling .\contracts\Ownable.sol
...
> Artifacts written to C:\Users\...
> Compiled successfully using:
    - solc: 0.8.11+commit.d7f03943.Emscripten.clang

Starting migrations...
======================
> Network name:    'develop'
> Network id:      5777
> Block gas limit: 6721975 (0x6691b7)

1_initial_migration.js
======================
Replacing 'Migrations'
----------------------
> transaction hash:    0x648db6b8ea92f89a888ea8a71d4bccacb7dc11022ae9caaf6f9f102fc9fc33d4
> Blocks: 0            Seconds: 0
> contract address:    0xf1b6a9940BB6291efe6AF993C786C4072Dd2813F
> block number:        1
> block timestamp:     1645118620
> account:             0xa1059269210fD1671451F7eE0e308e8132f7353B
> balance:             99.999314432875
> gas used:            203131 (0x3197b)
> gas price:           3.375 gwei
> value sent:          0 ETH
> total cost:          0.000685567125 ETH
> Saving migration to chain.
> Saving artifacts
-------------------------------------
> Total cost:      0.000685567125 ETH

2_deploy_contracts.js
=====================
    Deploying 'MyContract1'
-----------------------
> transaction hash:    0x3870db0dfa926917829f9b144c7b0a46ce7cf36ab1c1d0193998c395733070df
> Blocks: 0            Seconds: 0
> contract address:    0xfBa53eC12810E28F447c8646869153018aE500da
> block number:        3
> block timestamp:     1645118620
> account:             0xa1059269210fD1671451F7eE0e308e8132f7353B
> balance:             99.994690727623311439
> gas used:            1408065 (0x157c41)
> gas price:           3.177024705 gwei
> value sent:          0 ETH
> total cost:          0.004473457291245825 ETH
> Saving migration to chain.
> Saving artifacts
-------------------------------------
> Total cost:     0.004473457291245825 ETH
Summary
=======
> Total deployments:   2
> Final cost:          0.005159024416245825 ETH
- Blocks: 0            Seconds: 0
- Saving migration to chain.
- Blocks: 0            Seconds: 0
- Saving migration to chain.
Truffle React Box
我們在 App.js 中可以建置我們想要呈現的各種前端,藉由和智能合約互動便可以迅速的測試 DApp 的運作。
要啟動 Truffle 的客戶端和平常我們啟動 React 無異。首先打開一個新的 Terminal,後輸入以下指令即可:

$ cd client
$ npm start
在 Truffle 進行 Unit-Testing
首先打開 test 資料夾
-
.js檔是從使用者角度看測試 -
.sol檔是從鏈上的角度看測試
在 .js 檔案中我們將其命名為: testMyContract1.js

const TK =  artifacts.require("TK");
contract("MyContract1", accounts => {
it("should let you create new Items.", async () => {
const token = await TK.deployed();
const balance = await token.balanceOf(accounts[0]);
assert.equal(balance.toNumber(), 10000);
});

it("should transfer 100 token from the accounts[0] to accounts[1", async() => {
const token = await TK.deployed()
await token.transfer(accounts[1], 100, { from: accounts[0]});
const balance = await token.balanceOf(accounts[1]);
assert.equal(balance.toNumber(), 100);
});
});
這樣的測試可以針對 ERC-20 代幣的眾籌進行測試,像是 Contract 是否有接收到 10000 個 Tokens 和 Transfer 100 個 Tokens,測試這兩個行為是否成功。
-
contract 關鍵字告訴 Truffle 需要測試的合約名稱
-
it 表示我們要測試的功能應該做到什麼事情。
練習題解答
-
練習題解答 1
-
如何在 Go-Ethereum, Geth 架設私有鏈並發起交易?
-
1. Create Directory Structure
隨意建立一個資料夾,假設叫做「myPrivateChain」,進入該資料夾當作 我們目前的專案位置。
2. Create a Genesis Configuration
建立創世區塊的參數用檔案,將其命名為 genesis.json。


3. Initialize the genesis.json
初始化,輸入以下指令來建立初始區塊。

$ geth --datadir <path-to-data-directory> init <path-to-genesis- block>
--datadir data : 使區塊儲存於 <path-to-data-directory> 資料夾中。
4. Start!
啟動私有鏈

geth --datadir data --networkid 123456 consolenetworkid 選項後面跟一個數字,指定這個私有鏈的網絡 ID 為 123456。
更多參數(查看 go 之後有些已不能使用)

如果要查看更多的參數可以參閱 Management-APIs
5. Management of the Private Chain
查看所有帳號還有帳號存款 accounts 是一個陣列所以也可以使用[] 陣 列取值運算子來取用,也可以使用新變數來表示帳號字串:

> eth.accounts > eth.getBalance("0x748Cf24cc44Cc20239662eb04dF48ce7Aa019E16")> myEthereumAddress = eth.accounts[0]
查看節點資訊, 如果要使用更多 admin 指令可以參閱在 go-ethereum 的 Wiki:

> admin.nodeInfo建立新帳戶,其中的字串為預設密碼:

> personal.newAccount("88888888")查看礦工帳號,系統預設礦工帳號會是第一個帳號:

> eth.coinbase
6. Transfer Ether
解鎖帳號。每次進行交易都需要解鎖帳號,這邊的 myEthereum Address 要填入想要交易的帳號,也可以使用 eth.accounts[1] 取用所有帳號裡面的任 一個:

> personal.unlockAccount(eth.accounts[1])之後出現的 Passphrase 就是輸入密碼的意思,輸入創建時的密碼就可以成功解鎖!
發送交易,我們想要將 eth.accounts[1] 的錢錢匯給 myEthereumAddress:

> amount = web3.toWei(10,'ether')
"10000000000000000000"
> eth.sendTransaction({from:eth.accounts[1],to:myEthereumAddress,value:amount})
這裡需要注意的是如果匯出帳戶沒錢也會出現錯誤!
此時來查看 myEthereumAddress 的餘額:

> eth.getBalance(myEthereumAddress)

0
發現沒有被處理,我們可以查看 txpool 來驗證。
發現其中有一條 pending 的交易,pending 就表示已提交但還未被處理 的交易。

> txpool.status {pending: 1,queued: 0 }
要使交易被處理就需要挖礦了。
7. Mining Time
我們可以使用以下指令來更改礦工帳號,這樣挖礦時錢就會轉到對應的帳號。

> miner.setEtherbase(eth.accounts[1])我們可以執行以下步驟,首先語法 miner.start(1) 會開始挖礦,最後 miner.stop() 就是停止挖礦。

>  miner.start(1)

>  miner.stop()
其中 miner.start(1) 的參數為 CPU 使用數。 挖礦結束後再回來查看一次 txpool,發現 pending 的交易數量為 0。

>  txpool.status
{
pending: 0,
queued: 0
}
再查看一次接受轉帳的帳戶是否有收到匯款了!

> web3.fromWei(eth.getBalance(myEthereumAddress),'ether')使用以下指令來查看區塊數量。

> eth.blockNumber